windows terminal配置git bash及bash快捷指令

日常开发中一直使用 vagrant 作为虚拟机的管理工具,当共享目录很多时,虚拟机里的 git 分支的操作就会变得很慢,今天抽空配置了下 windows terminal 的 git bash 支持,这样以后只把 vagrant 作为运行项目的环境,代码相关的 git 操作还是在本地,不用进入虚拟机。

首先 windows terminal 默认是不支持 git bash 的,需要我们自己配置一下。

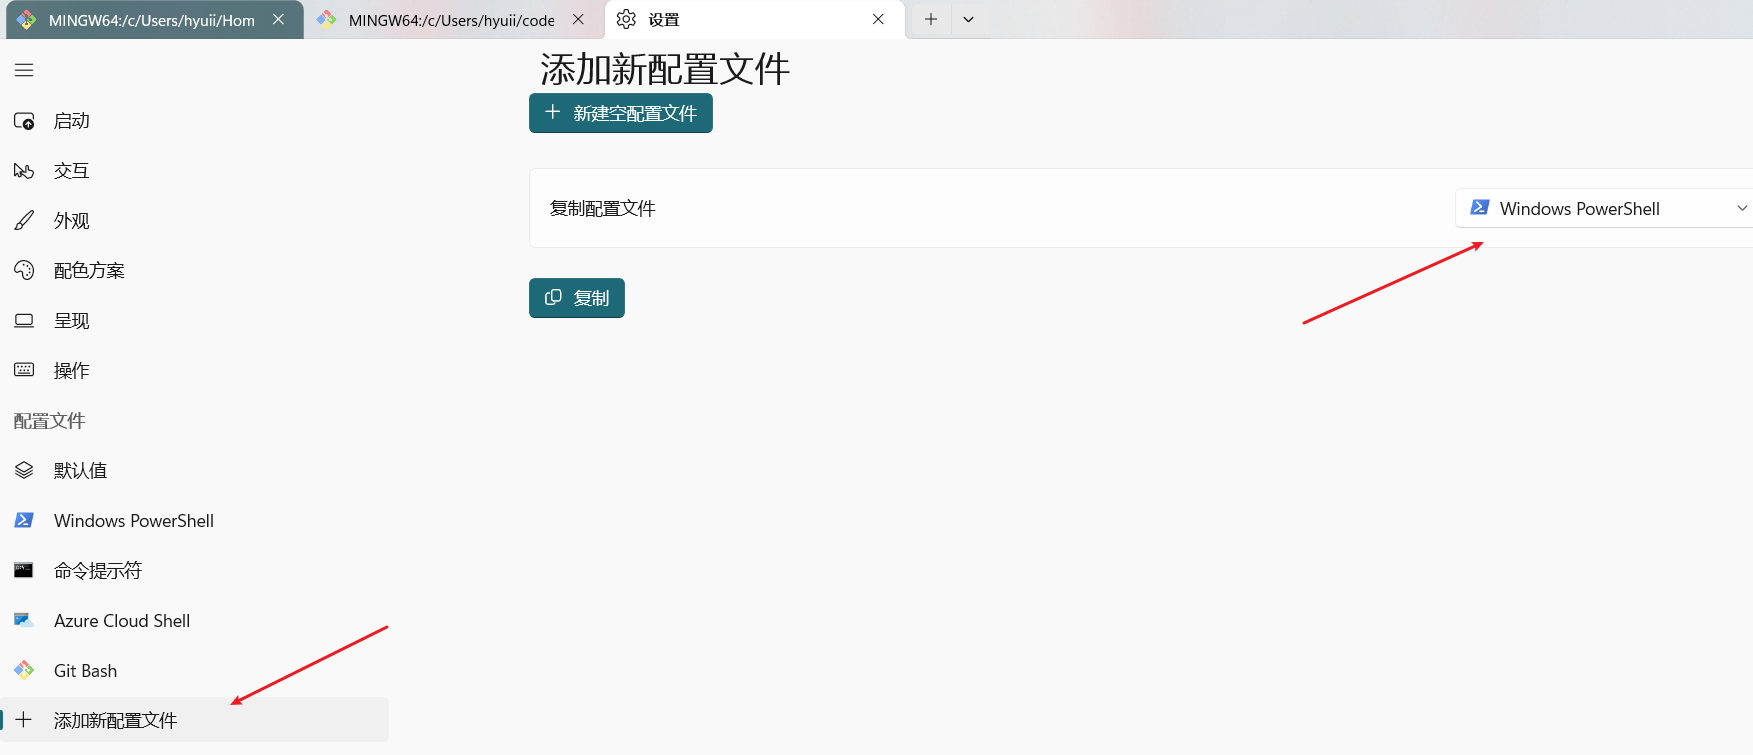
点击”添加新配置文件”,复制 Windows PowerShell 的配置文件。

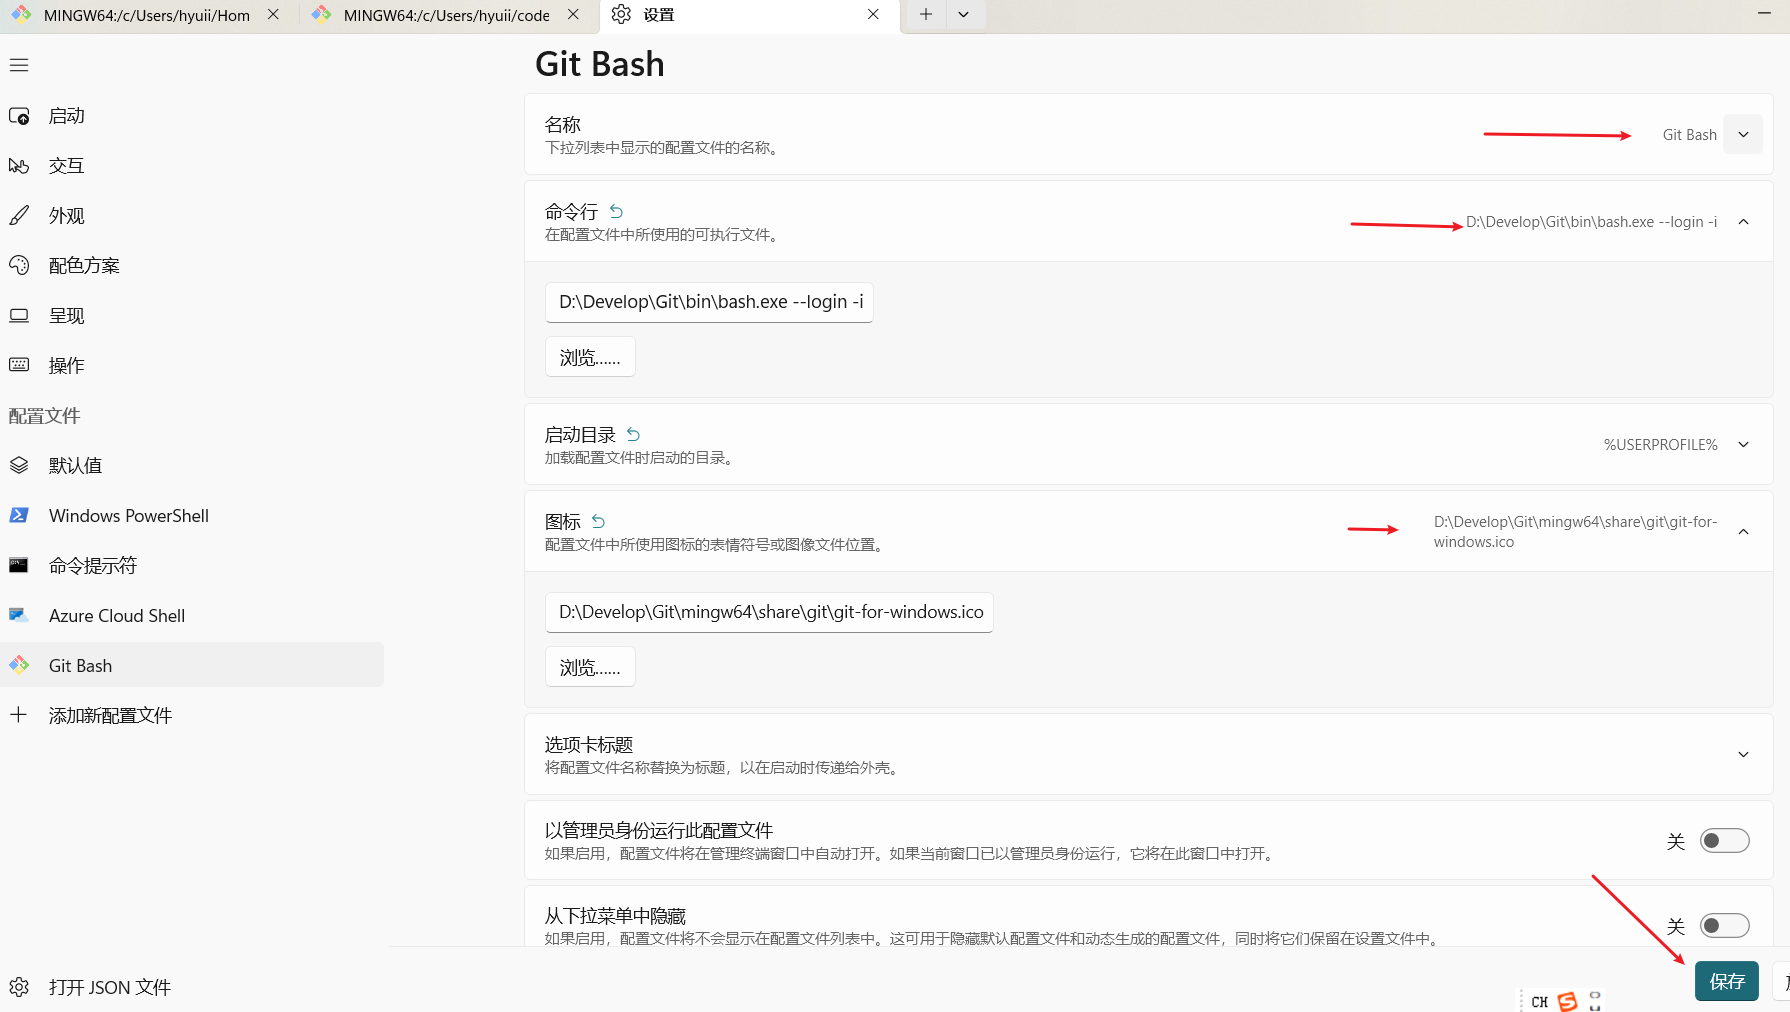
更改名称为”Git Bash”, 命令行为”D:\Develop\Git\bin\bash.exe –login -i”, 注意加上”–login -i”, 图标为”D:\Develop\Git\mingw64\share\git\git-for-windows.ico”, 然后点击保存。
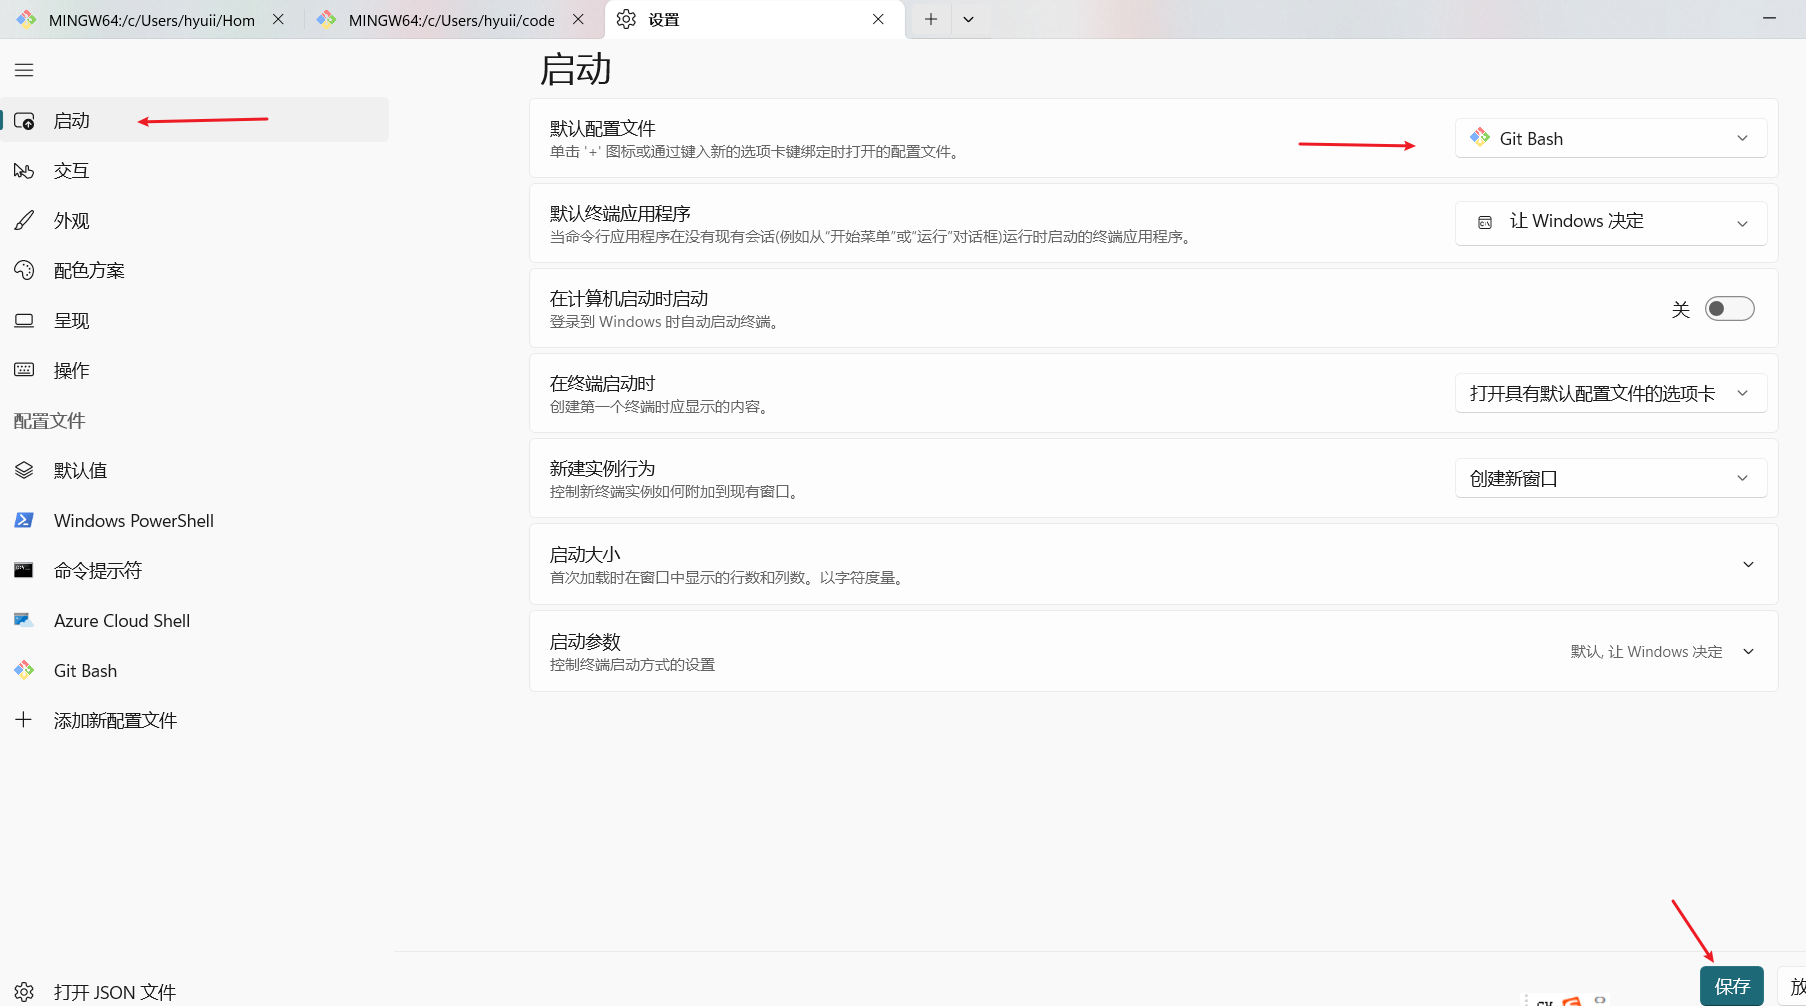
设置Git Bash为默认启动。

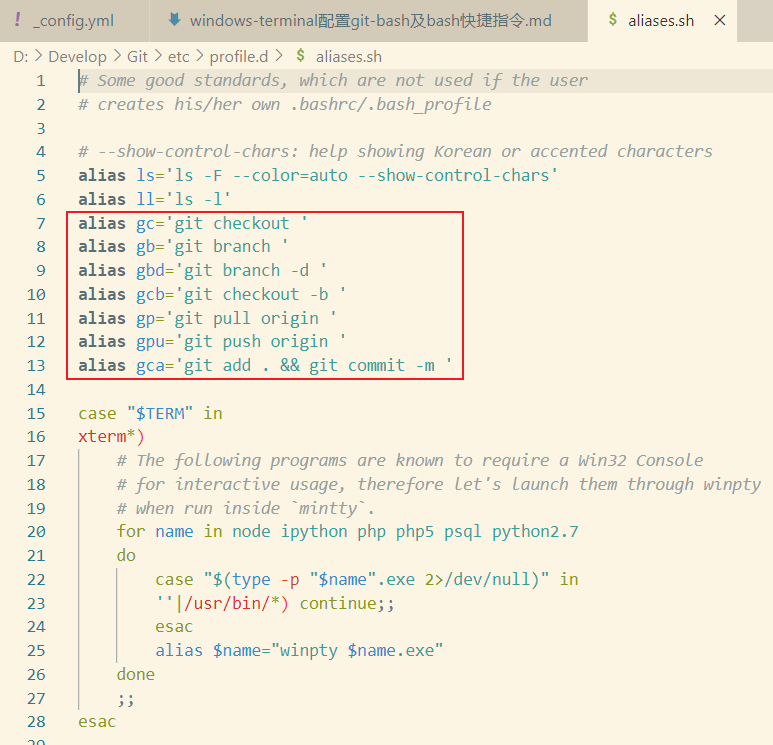
为了操作方便, 我给 git 加了一些快捷指令, 可以更改 git 安装目录 etc/profile.d 下的 alias.sh 文件。

使用 Charles + Shadowrocket 进行 IOS 抓包

Charles 安装

  1. 安装最新版 :https://www.charlesproxy.com/download/latest-release/
  2. 注册 :点击 Help -> Register to ,录入下面的授权信息 ,或者访问 https://www.charles.ren 生成
1
2
Registered Name:ddmc
License Key:8DEA943587A9B04870
  1. 打开 socket 代理 :Proxy -> Proxy Settings 勾选 Enable SOCKS proxy

启用 SSL 请求代理

windows 安装证书 :

  • Help -> SSL Proxying -> Install Charles Root Certificate ,点击安装证书 。
  • 在为证书指定位置时,选择”将所有的证书都放入下列存储”,选择”受信任的根证书颁发机构”。
  • 安装完之后重启 charles

iPhone 安装证书:

  • 通过 safari 访问 chls.pro/ssl 安装证书,如果访问不了,可以在 windows 上访问该地址下载后,再传输到 iPhone 中。
  • 证书下载完,到系统设置的首页进行安装。
  • 证书安装好通过 :设置 -> 通用 -> 关于本机 -> 证书信任,信任刚才安装的证书。

windows 启用 SSL :Proxy -> SSL Proxy Setting -> Enable SSL Proxying

配置 Shadowrocket

打开 shadowrocket ,添加服务器 ,类型选择 Socks5 ,Address 填 Charles 机器的 IP 地址,Port 填 Charles 设置的 Socks 端口(与 HTTP 的不同)。Charles 地址可以通过 :Help -> Local IP Address 查看。

添加完成,开启代理。此时 iPhone 访问网络,Charles 应该会有一个允许访问网络的弹窗,点击允许。如果 Charles 没有刷新内容,且 iPhone 无法上网 ,可以尝试关闭 windows 防火墙,重启下 Charles 。

Charles 证书过期处理

  1. 重置证书:在Charles中,通过选择“Help”->“SSL Proxying”->“Reset Charles Root Certificate”来重置证书。
  2. 重新安装证书:重置后,再次通过“Help”->“SSL Proxying”->“Install Charles Root Certificate”来安装证书。
  3. 在电脑上信任证书
    • 对于Windows系统,你可能需要手动打开证书目录(可以通过运行certlm.msc或certmgr.msc来访问),删除过期的证书,并确保新的证书被信任。
    • 对于Mac系统,打开钥匙串访问,找到Charles的证书,并设置为“始终信任”。
  4. 在移动设备上安装证书
    • 对于iOS设备,打开Safari浏览器,输入chls.pro/ssl来下载并安装证书。然后,在“设置”->“通用”->“关于本机”->“证书信任设置”中信任该证书。
    • 对于Android设备,通常需要在浏览器中访问相同的URL来下载并安装证书。
  5. 重启Charles和设备:在安装新证书后,重启Charles和你的设备以确保更改生效。
  6. 检查网络连接:确保你的设备与Charles代理服务器之间的网络连接是稳定的,任何网络问题都可能导致证书下载失败。
  7. 检查代理设置:确保你已经正确配置了所有的代理设置,错误的代理设置可能会导致连接问题

docker使用

搭建 nginx + php-fpm

1
2
3
4
5
6
7
8
9
10
11
12
13
# 获取 php-fpm8.2 配置文件(23d4f3cf4092 为先启动的一个 php-fpm 容器)
docker cp 23d4f3cf4092:/usr/local/etc/php/ ./
docker cp 23d4f3cf4092:/usr/local/etc/php-fpm.conf ./
docker cp 23d4f3cf4092:/usr/local/etc/php-fpm.d ./

# 运行 php-fpm8.2容器
docker run --name php82-fpm --network dnmp -d -p 9000:9000 -v /mnt/c/Users/hyuii/code/docker/lnmp/php/php-fpm.d:/usr/local/etc/php-fpm.d -v /mnt/c/Users/hyuii/code/docker/lnmp/html:/var/www/html php:8.2-fpm

# 获取 nginx 配置文件(eca00766479f 为先启动的一个 nginx 容器)
docker cp eca00766479f:/etc/nginx/conf.d ./

# 运行 nginx
docker run -d -p 80:80 -v /mnt/c/Users/hyuii/code/docker/lnmp/nginx/conf.d:/etc/nginx/conf.d -v /mnt/c/Users/hyuii/code/docker/lnmp/html:/var/www/html --network dnmp nginx:1.26.0

nginx 配置文件示例

1
2
3
4
5
6
7
8
9
10
11
12
13
14
15
16
17
18
19
20
21
22
23
24
25
26
27
server {
listen 80;
listen [::]:80;
server_name localhost;

#access_log /var/log/nginx/host.access.log main;

location / {
root /var/www/html;
index index.html index.htm index.php;
}

# 容器网络中,使用 php82-fpm 容器名来访问 php-fpm
location ~ \.php$ {
fastcgi_pass php82-fpm:9000;
fastcgi_index index.php;
fastcgi_param SCRIPT_FILENAME /var/www/html$fastcgi_script_name;
include fastcgi_params;
}

# deny access to .htaccess files, if Apache's document root
# concurs with nginx's one
#
#location ~ /\.ht {
# deny all;
#}
}

访问 php 文件 404

1
2
# 需要把 nginx server 块配置文件的 SCRIPT_FILENAME 值加上对应的 php-fpm 中的项目目录
fastcgi_param SCRIPT_FILENAME /var/www/html$fastcgi_script_name;

php 安装 redis 扩展

1
2
3
4
5
pecl install redis-5.3.7 
docker-php-ext-enable redis

# 重启 php-fpm
docker restart 容器id

docker-compose 文件

1
2
3
4
5
6
7
8
9
10
11
12
13
14
15
services:
nginx:
image: "nginx:1.26.0"
ports:
- "80:80"
volumes:
- /mnt/c/Users/hyuii/code/docker/lnmp/nginx/conf.d:/etc/nginx/conf.d
- /mnt/c/Users/hyuii/code/docker/lnmp/html:/var/www/html
php82-fpm:
image: "php:8.2-fpm"
ports:
- "9000:9000"
volumes:
- /mnt/c/Users/hyuii/code/docker/lnmp/php/php-fpm.d:/usr/local/etc/php-fpm.d
- /mnt/c/Users/hyuii/code/docker/lnmp/html:/var/www/html

使用 Supervisor 管理进程

Supervisor 是 Linux 系统上进程管理的工具,它可以帮我们监控创建的进程的运行状态。Supervisor 由两部分组成,supervisord 和 supervisorctl 。supervisord 是服务端部分,它会根据配置文件,启动与管理进程。supervisorctl 是客户端工具,它包含一些命令控制 supervisord 。

安装 Supervisor

ubuntu 上安装

1
sudo apt-get install supervisor

不同的 linux 上 Supervisor 的配置文件可能不一样。 ubuntu 上安装的 Supervisor 位于 /etc/supersor/supervisord.conf ,自己创建的进程配置文件放在 /etc/supervisor/conf.d/ 目录下,配置文件以 .conf 后缀。centos 上安装的 Supervisor 位于 /etc/supervisord.conf ,自己创建的进程配置文件放在 /etc/supervisord.d 目录下 ,配置文件以 .ini 后缀。

Supervisor 配置

1
2
3
4
5
6
7
8
9
10
11
12
13
14
15
16
17
18
19
20
21
22
23
24
25
26
27
28
; supervisor config file

[unix_http_server]
file=/var/run/supervisor.sock ; (the path to the socket file)
chmod=0700 ; sockef file mode (default 0700)

[supervisord]
logfile=/var/log/supervisor/supervisord.log ; (main log file;default $CWD/supervisord.log)
pidfile=/var/run/supervisord.pid ; (supervisord pidfile;default supervisord.pid)
childlogdir=/var/log/supervisor ; ('AUTO' child log dir, default $TEMP)

; the below section must remain in the config file for RPC
; (supervisorctl/web interface) to work, additional interfaces may be
; added by defining them in separate rpcinterface: sections
[rpcinterface:supervisor]
supervisor.rpcinterface_factory = supervisor.rpcinterface:make_main_rpcinterface

[supervisorctl]
serverurl=unix:///var/run/supervisor.sock ; use a unix:// URL for a unix socket

; The [include] section can just contain the "files" setting. This
; setting can list multiple files (separated by whitespace or
; newlines). It can also contain wildcards. The filenames are
; interpreted as relative to this file. Included files *cannot*
; include files themselves.

[include]
files = /etc/supervisor/conf.d/*.conf

创建自己的进程

1
2
3
4
5
6
7
8
9
10
11
12
13
14
15
16
17
18
19
20
21
[program:toolapi]
# 进程执行命令 ,通过 bash -c 执行 shell 命令
command=bash -c "source /usr/bin/activate py3108 && cd /home/tool-api && uvicorn tool-api:app --host 0.0.0.0 --port 80 --reload"
# 自动启动
autostart=true
# 自动重启
autorestart=true
# 执行用户
user=sd
# 进程数
numprocs=1
# 将标准错误重定向到标准输出日志文件
redirect_stderr=true
# 错误日志文件
stderr_logfile=/home/log/supervisor/toolapi_err.log
# 输出日志文件
stdout_logfile=/home/log/supervisor/toolapi.log
# 进程停止时,其子进程也停止
stopasgroup=true
# 进程杀死时,其子进程也杀死
killasgroup=true

Supervisor 常用命令

  • sudo supervisorctl reload : 重新加载配置

  • sudo supervisorctl update : 使用新的配置启动新的或已更改的进程

  • sudo supervisorctl start program_name:启动名为 program_name 的进程。

  • sudo supervisorctl stop program_name:停止名为 program_name 的进程。

  • sudo supervisorctl restart program_name:重启名为 program_name 的进程。

  • sudo supervisorctl status:查看所有进程的状态。

  • sudo supervisorctl status program_name:查看名为 program_name 的进程的状态。

Supervisor 启动

  • sudo systemctl start supervisorsudo supervisord

dcat admin 拖拽排序

dcat admin 本身提供的模型树 ,可以实现拖拽排序的功能,只是这个功能没办法融合现有的数据表格相关的功能,所以网上找了一个支持拖拽的插件 :https://github.com/pstldz/dcat-admin-grid-sotrable 。官方本身也提供了一个支持拖拽的插件,不过是基于 1.0 的,我们的项目版本 2.2 没办法使用。

插件的安装

安装

1
composer require pstldz/dcat-admin-grid-sotrable

然后打开http://yourhost/admin/auth/extensions ,依次点击 更新启用

使用

修改模型

1
2
3
4
5
6
7
8
9
10
11
12
use Spatie\EloquentSortable\Sortable;
use Spatie\EloquentSortable\SortableTrait;

class Template extends Model implements Sortable
{
use SortableTrait;

public $sortable = [
'order_column_name' => 'order_column',
'sort_when_creating' => true,
];
}

添加数据仓库

1
2
3
4
5
6
7
8
9
<?php

use Dcat\Admin\Repositories\EloquentRepository;
use App\Entities\Template as TemplateModel;

class Template extends EloquentRepository
{
protected $eloquentClass = TemplateModel::class;
}

在表格中使用对应的排序字段

1
2
3
4
5
use App\Repositories\Template;

return Grid::make(Template::class, function (Grid $grid) {
$grid->sortable('order_column');
};

定制逻辑

由于这个插件默认是按照排序字段正序的,项目中使用的是倒序,且要把已隐藏的模板置后,所以自定义了排序逻辑。

1
2
3
4
5
6
7
8
9
10
11
12
13
14
15
16
17
18
class Template extends Model implements Sortable
{
use SortableTrait;

public $sortable = [
'order_column_name' => 'order_column',
'sort_when_creating' => true,
];

// 定制排序 ,重写了 SortableTrait 中的方法
public function scopeOrdered(Builder $query, string $direction = 'desc')
{
// return $query->orderBy($this->determineOrderColumnName(), $direction);
return $query->orderByDesc('status')
->orderByDesc('sort')
->orderByDesc('id');
}
}

修改了排序逻辑之后,需要修改保存排序按钮的工具逻辑。

1
2
3
4
5
6
7
8
9
10
11
12
13
14
15
16
17
18
19
20
21
22
23
24
25
26
27
<?php

namespace Pstldz\DcatAdminGridSotrable;

use Dcat\Admin\Admin;
use Dcat\Admin\Form;
use Dcat\Admin\Grid\Tools\AbstractTool;
use Illuminate\Http\Request;

class SaveOrderButton extends AbstractTool
{
// ......
public function handle(Request $request)
{
$status = true;
$column = $request->post('_column');
$message = admin_trans('sortable.save_succeeded');
$repository = $request->post('_model');

$sorts = $request->post('_sort');
$sorts = collect($sorts)
->pluck('key')
->combine(
collect($sorts)->pluck('sort')->sortDesc() # 改成倒序
);
// ......
}

电脑与手机共享文件

有时候想要将电脑中文件同步到手机,首先想到的是借助微信、qq 这样的三方工具。这样有点麻烦,需要来回的登录账号。而作为开发我们的电脑中大多都有类似 nginx 的服务器软件,或者 php 这样的脚本语言。那么我们可以在电脑中启一个简单的静态 web 站点,就可以通过访问电脑的 ip 的方式,获取到电脑中的文件,下面以 php 为例说明一下。

  1. 确保手机与电脑连接在同一个局域网
  2. 确保电脑安装了 5.4 版本以上的 php
  3. 将要共享的文件放入同一个目录,并执行以下命令
1
2
# -S 后跟本机 ip 地址加 web 端口,-t 后跟站点目录
php -S 10.19.1.29:8080 -t ./sign_apk
  1. 这样就可以在手机上通过访问 10.19.1.29:8080/xxxx_filename 的方式,获取指定的文件

服务器连接外网的方式

  1. 克隆 clash for linux 项目
1
git clone https://github.com/wanhebin/clash-for-linux.git
  1. 进入目录,修改 .env 文件中的订阅地址
1
2
cd clash-for-linux
vim .env

CLASH_URL 是订阅地址 ,CLASH_SECRET 是 web 界面的密码

image-20231026160459452

  1. 执行启动脚本
1
sudo bash start.sh
  1. 加载环境变量
1
source /etc/profile.d/clash.sh
  1. 启动或关闭代理
1
2
3
4
# 开启
proxy_on
# 关闭
proxy_off

检测服务端口

1
2
3
4
5
$ netstat -tln | grep -E '9090|789.'
tcp 0 0 127.0.0.1:9090 0.0.0.0:* LISTEN
tcp6 0 0 :::7890 :::* LISTEN
tcp6 0 0 :::7891 :::* LISTEN
tcp6 0 0 :::7892 :::* LISTEN

检测环境变量

1
2
3
$ env | grep -E 'http_proxy|https_proxy'
http_proxy=http://127.0.0.1:7890
https_proxy=http://127.0.0.1:7890

python常用数据结构的声明与使用

list

声明方式

1
2
3
l1 = [1, 2, 3, 4]
l2 = list([1, 2, 3, 4])
l3 = list(range(1, 5))

方法

  • append(item): 在列表末尾添加元素。
  • insert(index, item): 在指定位置插入元素。
  • remove(item): 删除第一个匹配的元素。
  • pop(index): 弹出指定位置的元素。
  • len(list): 返回列表的长度。
  • index(item): 返回指定元素的索引。
  • count(item): 统计指定元素出现的次数。
  • sort(): 对列表进行排序(就地排序)。
  • reverse(): 反转列表元素的顺序。

tuple

声明

1
2
t1 = (1, 2, 3)
t2 = tuple([1, 2, 3])

dict

声明

1
2
d1 = {'name': 'Alice', 'age': 30}
d2 = dict([('a', 1), ('b', 2)])

方法

  • keys(): 返回字典的所有键。
  • values(): 返回字典的所有值。
  • items(): 返回字典的所有键-值对。
  • get(key): 根据键获取对应的值。
  • pop(key): 弹出指定键的值。
  • len(dict): 返回字典中键-值对的数量。
  • innot in:检查键是否存在于字典中。

set

声明

1
2
s1 = {1, 2, 3}
s2 = set([1, 2, 3])

方法

  • add(item): 添加元素到集合。
  • remove(item): 移除集合中的元素,如果元素不存在会引发错误。
  • discard(item): 移除集合中的元素,如果元素不存在不会引发错误。
  • pop(): 弹出一个元素。
  • len(set): 返回集合的大小。
  • innot in:检查元素是否存在于集合中。

Linux软件管理的一些总结

dnf 包管理工具

dnf 是 yum 的升级版,与 yum 相比提升了性能,也提供了一些新功能。在 CentOS8 和 RHEL8 中默认使用 dnf 作为包管理工具。它的命令跟 yum 类似,下面是一些常用的命令。

  1. 安装软件包
1
sudo dnf install package-name
  1. 搜索软件包
1
sudo dnf search keyword
  1. 列出已安装的软件包
1
sudo dnf list installed
  1. 升级软件包
1
sudo dnf update
  1. 删除软件包
1
sudo dnf remove package-name
  1. 列出可用软件组
1
sudo dnf group list
  1. 安装软件组
1
sudo dnf group install package-group
  1. 清理缓存
1
sudo dnf clean all
  1. 查看软件包信息
1
sudo dnf info package-name

EPEL 存储库

EPEL(Extra Packages for Enterprise Linux) 是针对企业级Linux发行版(如 CentOS、RHEL)的一个社区维护的软件包存储库。EPEL 存储库中包含了一些额外的软件包,这些软件包在原始发行版的 Linux 存储库中可能没有包含,但在企业环境中非常有用。比如咱们常用的 Redis、Nginx。在这里可以查看 epel 有哪些软件包:https://rhel.pkgs.org/8/epel-x86_64/8/

用 yum 或 dnf 安装 epel 存储库

1
2
sudo yum install epel-release
sudo dnf install epel-release

systemctl 管理工具

systemctl 是一个用于管理系统服务的命令行工具,用于替代传统的 init 系统。它有以下常用的命令

  • systemctl start service_name: 启动一个服务。
  • systemctl stop service_name: 停止一个服务。
  • systemctl restart service_name: 重启一个服务。
  • systemctl reload service_name: 重新加载服务的配置。
  • systemctl status service_name: 查看服务的状态信息。
  • systemctl enable service_name: 设置服务在开机时自动启动。
  • systemctl disable service_name: 禁用服务的开机自动启动。

每一个服务在 /usr/lib/systemd/system 目录下都有一个 service 文件,service 文件中的 ExecStartExecStop 控制服务如何启动与停止。reload 功能由 systemctl 提供。

如果你要让 systemctl 管理自己的软件,同样需要在 /usr/lib/systemd/system 下创建自己的 service 文件,然后执行 sudo systemctl daemon-reload 命令使配置生效。

添加 sudo 用户与限制 root 登录

  1. 添加用户并加入 sudo 组
1
2
3
sudo useradd username
sudo passwd username
sudo usermod -aG wheel username
  1. 设置执行 sudo 命令不输入密码
1
2
3
sudo visudo
# 或者
sudo vim /etc/sudoers

​ 在编辑文件中加入这一行 username ALL=(ALL) NOPASSWD: ALL

  1. 设置不允许 root 用户登录
1
sudo vim /etc/ssh/sshd_config

​ 找到并修改 PermitRootLogin no

​ 重启 sshd

1
sudo systemctl restart sshd